
UDPATE FEB 2021 – THESE INSTRUCTIONS ARE OUT OF DATE
The writers of Weather34 have done a ton of work and made installing on a remote server much easier! New Instructions Here.
Original Post – Archived – Obsolete
Here’s a howto on installing the Weather34 Template provided by Ian Steeple using a remote webhost fed by a Weewx weather server.
This Howto assumes you already have a working weewx/remote web server setup for normal weewx operations.
The Weather34 package from Ian Steeple is a weewx extension and a skin.
On the Weewx side we will install the extension and just the generating portion of the skin by installing the full extension and skin and then removing the portions we don’t need.
The full skin will be installed on the web server side to actually present the website.
Installing Weather34 on the WeeWx server side first.
Let’s setup the Weewx side first. If you don’t already have Weewx installed, you should do that.
You must be running at least version 3.9.2 of WeeWx.
Part A: The Extension on WeeWx
- Stop the Weewx service.
- Make sure you install the pyephem module for python.
- Go to your weewx/public_html directory and create a new directory in public_html called “realtime” (if you don’t already have one for realtime files).
It’s important that this directory is within the public_html directory of weewx so that it is sent to your remote server. - Download the full zip file for the weewx/weather34 project from Ian Steeple’s Git Project page. Expand it in a directory outside your weewx main directory. I like to put my extension packages in the directory immediately outside the weewx directory.
- From a command prompt at the weewx directory, install the extension:
(more general help on weewx extensions here)
$./bin/wee_extension --install ../weewx-Weather34-master- Once installed, head to the weewx.conf file and look for the [Weather34RealTime] section and change the path so the w34realtime.txt file is created inside the realtime directory in public_html.
[Weather34RealTime]
  		filename = /var/www/html/weewx/public_html/w34realtime.txt
binding = loop-
If you are using a remote server already, then you should already be using either FTP or RSync to send your weewx files to your remote server.
I highly recommend RSync (you’ll want it for an optional part below too). If you have not set up RSync yet, set it up now using the Weewx RSync docs.
- Save the weewx.conf file (don’t restart weewx yet).
Part B: Modifying the Skin on WeeWx
Since the web site is hosted remotely, the static php, css, html and other web files in the skin are redundant. They also present a potential annoyance as they will be uploaded to your remote server and could wipe out any modifications you make on the remote server skin.
We only need the files that weewx generates.
- Go to the newly created weewx/skins/Weather34 directory.
- You must keep one folder and two files below:
- mbcharts
- skin.conf
- w34stats.php.tmpl
- Remove all but those three items in the Weather34 directory.
- Go into the mbcharts directory.
- Keep the chartdata folder, remove all other files and folders.
- Go back into the weewx.conf file and look for [[Weather34Report]]. Set the HTML_ROOT to your desired location.
- Restart Weewx.
- Wait 5 minutes for Weewx to do the first generation. Check that everything is where you specified in weather34 HTML_ROOT.
- Stop Weewx.
- Go into your weather34 HTML_ROOT folder and chmod/change permissions of all files and folders recursively to 0775.
- Important Potential Requirement: If, like me, your weewx installation is storing its database values in U.S. units (or other non-metric systems), you may need to modify the units for the Weather34Report which controls the graphing and statistics.
If this doesn’t apply to you, go to Step 12.
Otherwise, change the units in the skin.conf file to what you need them to be and add the same to the [Weather34Report] section in weewx.conf as below.
Make sure you have the right amount of nested brackets in the weewx.conf file!
[[Weather34Report]]
        HTML_ROOT = public_html/weather34
        skin = Weather34
        [[[Units]]]
            [[[[Groups]]]]

                group_altitude = meter
                group_degree_day = degree_C_day
                group_pressure = hPa
                group_rain = mm
                group_rainrate = mm_per_hour
                group_speed = km_per_hour
                group_speed2 = km_per_hour2
                group_temperature = degree_C

                mbar = "mb"
                hPa = "hPa"
                inHg = "in"
                mm_per_hour = "mm"
                cm_per_hour = "cm"
                inch_per_hour = "in"
                km_per_hour = "km/h"
                knot = "kts"
                meter_per_second ="m/s"
                mile_per_hour ="mph"

         [[[Labels]]]
                day = " day", " days"
                hour = " hour", " hours"
                minute = " minute", " minutes"
                second = " second", " seconds"
NONE = ""- Restart Weewx.
Optional 1-minute RSync cronjob.
By default, the RSync and FTP processes built-in to Weewx will copy the files up to the server at the regular 5 minute interval.
However, the realtime file will likely be updated more often than that, so you can set up a cronjob separately, using the same password-less ssh key login technique.
Here is my script… add it to your crontab.
/usr/bin/rsync -azv --rsh='ssh -p 22 -l remote-user' /my/path/to/weewx/public_html/realtime/ remoteserver.ca:/realtime
Part C: Install the Skin on the Remote Server
All you need to do is download and install the full package up onto the remove server.
- Download and extract the Weather34 Skin onto your remote website.
- Copy the contents of the Weather34 folder into your remote root web server directory
(it should match the same relative place as you specified in weewx.conf) - Check to make sure your realtime folder and w34realtime.txt file is being generated and copied up to the remote server from weewx.
- Check to make sure the files in the /mbcharts/datacharts folder are being generated and copied up to the remote server from weewx.
Do the regular Weather34 setup.
- Go through the regular weather34 setup process by navigating to your remote server at:
www.remoteweb.com/easywxsetup.php - The password is blank when you first start.
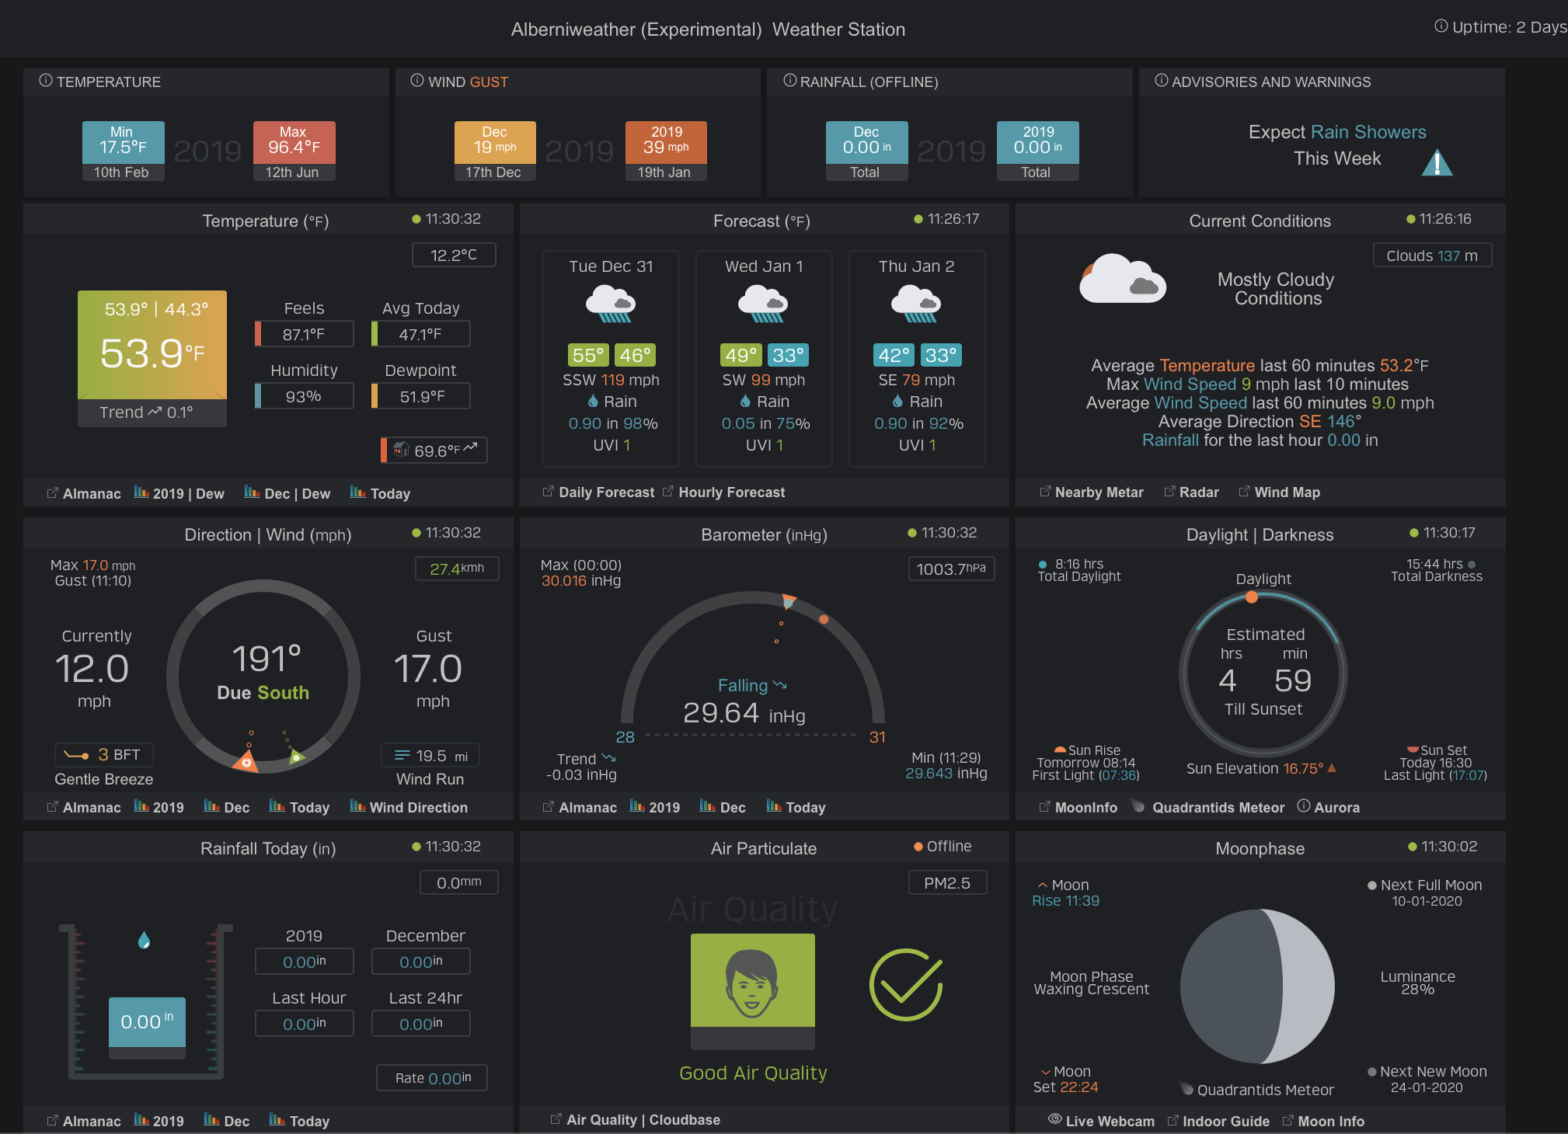
- That’s it! My website is up at www.alberniweather.ca/weather34 which is an extension to my regular weather blog at Alberniweather.
Thanks for following along, if you have any comments or corrections for these instructions please leave a comment below! 🙂