NOTE JUNE 2 2025: AS DIVUMWX IS STILL UNDER ACTIVE DEVELOPMENT THESE INSTRUCTIONS MAY CHANGE.
In 2022 I installed a new skin as part of my Alberniweather.ca website using the “Weather34” skin for displaying weather data from my Davis Weather Station. My setup is a little special because my weather data gathering server is at home, where it creates the webpages and then syncs them to a remote webserver. I created a step by step tutorial to show how to set up this kind of Remove Web Server with the weather 34 skin setup because it was a little more complicated than the normal install.
The developers of Weather34 have now completely revamped their skin and software and re-released it under the name DivumWX-Lite
There will be a ‘full’ DivumWX release in time but I don’t anticipate the installation process to be significantly different, so I’ll use the ‘lite’ version here to demonstrate.
The Steps! Let’s get started.
Pre-Install Requirements
- Find the Installation Guide on the Divum WX-Lite GitHub here.
- For the first few steps I’ll just repeat what is in the Installation Guide, you should refer to that page for detailed instructions.
- Install WeeWx using the PiP method — NOTE: If this is a brand new installation of weewx you should wait 24 hours before continuing to install DivumWx so the weewx database can fully populate.
- Enter the weewx virtual environment :
source ~/weewx-venv/bin/activate
- Check and upgrade pip
pip3 install --upgrade pip
- Install packaging.py if you haven’t already
pip3 install packaging
- Check for and Install php8.4 if needed (there is are example steps in the DivumWX Installation guide.
Preparing the DivumWx skin
- Go to the Services File Generator website to generate services.json configuration file.
- Ensure you fill out the correct values for your ‘external IP’ or domain name for your website and the “internal IP” for the local weewx/DivumWX computer.
- Move the services.json file to your local DivumWX server.
- Download the DivumWX Lite zip archive and move it to the DivumWX server.
- Check what users are running your systems.
ps aux | grep weewxps aux | grep apache— (or replaceapachewithnginx)- The first column returned in these commands will give you the user they are being run by, take note of them.
- Using SSH or on a terminal, unzip the diviumwx-divumwxLite zip file
- Move the services.json file you created into the divumwxlite folder.
- Change directory so your terminal is in the divumWXLite folder.
Running the DivumWXLite Installer
- Run the installer command
python dvmInstaller.py- ensure that any required python modules that it asks for get installed
- once all modules are available it will present the Installation guide which you can ‘q’ to exit
- The installer will put most of the web files in your default web directory (eg. /var/www/html/divumwx) and not the public-html directory in the pip weewx structure. This may change in future.
- Once you have moved through all of the steps in the dvmInstaller you should have three new skins in your weewx-data/skins directory
- DivumWx
- dvmHighcharts-day
- Heatmaps
- In the weewx.conf file look for the [DivumWXRealTime] stanza.
- for now, make sure “realtime_path_only”, “webserver_address”, and “weewx_file_transfer” are blank… this effectively ‘turns off’ remote support for now until we are ready.
- the weewxserver_address should be set to the local IP of your weewx server.
- Permissions are very important for the functioning of divumWX. You want to ensure permissions and ownership are set to:
- 0775
- (web server-group):(weewx user)
- I ran the following commands inside the /var/www/html/divumwx directory in order to set all the permissions throughout. My local user is called pi:
- chown -R www-data:pi *
- chmod -R 775 *
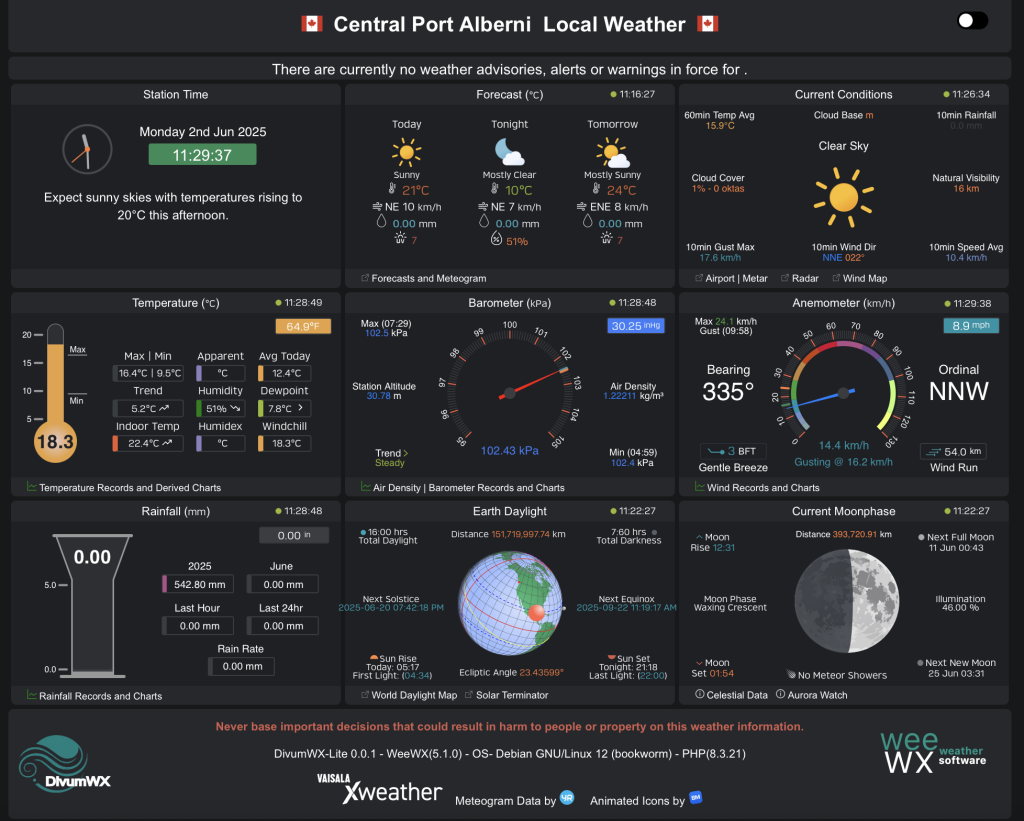
- If you have php running on your local weewx server you should now be able to access the divumwx web screen by going to the location in your browser. Make sure all of the times in the right-hand corners of the boxes are updating.
- (See screenshot from my local server at dataview.alberniweather.ca below the list)
- Finally, when you get access to the web interface, go to the menu (three lines, top left) and click “location settings”. Set them as you wish and make sure they save. It will send an error if it does not. If this occurs, go back and check permissions in step 5 above.
- If you make any changes to permissions, or weewx.conf, make sure you restart weewx to fully implement the changes. And wait at least 5 minutes for changes to populate.
Getting “remote” transfer to work
The final steps here are to get your local weewx machine that hosts the divumWX and other weewx skins to rsync to a remote machine for hosting your website on an external host. This is really the whole point of this tutorial.
- Copy the entire contents of the /var/www/html/divumwx directory to the location you want it on your external web server.
- Ensure the permissions are the same on the external web server as they are locally (775 and webserver-user:webserver-user)
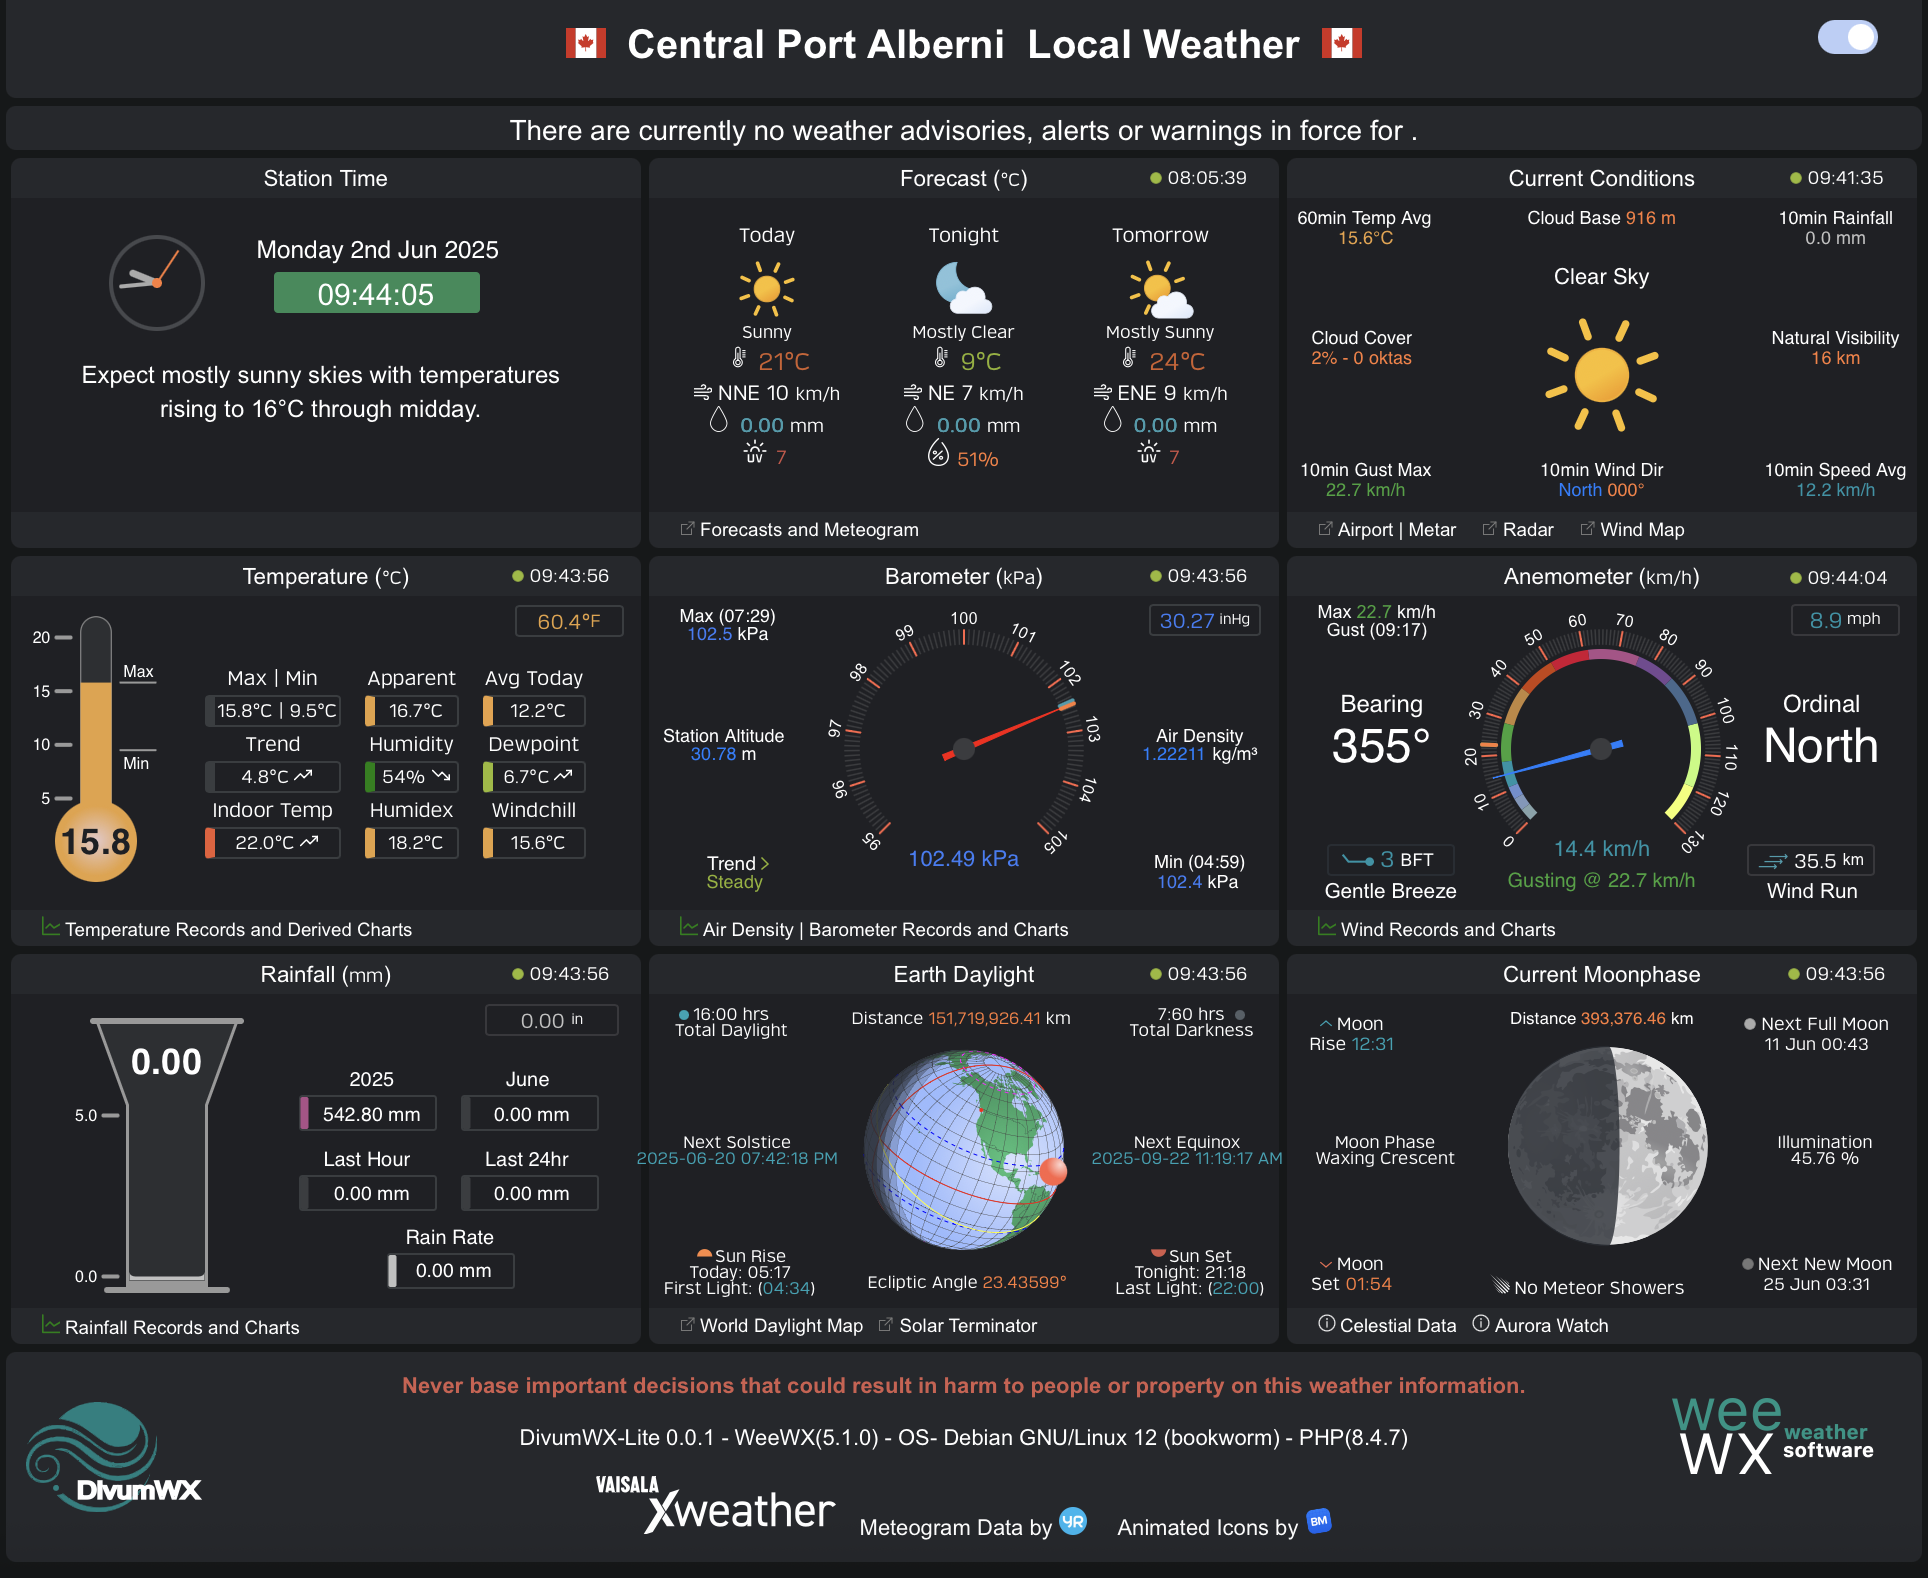
- NOTE: You should now be able to see and test your remote divumwx web server though the values may appear “offline” as weewx is not yet communicating with it.
- if you previously had a divumwx folder in your weewx-data/public-html folder, remove it to ensure nothing is overwritten later.
- Go back into weewx.conf and navigate to the DivumWXRealtime stanza
- This is what my stanza looks like. I’ve obscured my remote web directory. The most important features are the HTML_ROOT and _address fields.
- HTML_ROOT should be set to the full path on your remote server to the root of your divumwx website
- The _address fields can be domain names or ip addresses.
- for my purposes, alberniweather.ca points to my external website
- dataview.alberniweather.ca is an alias to my local weewx server so it should resolve to my local IP address
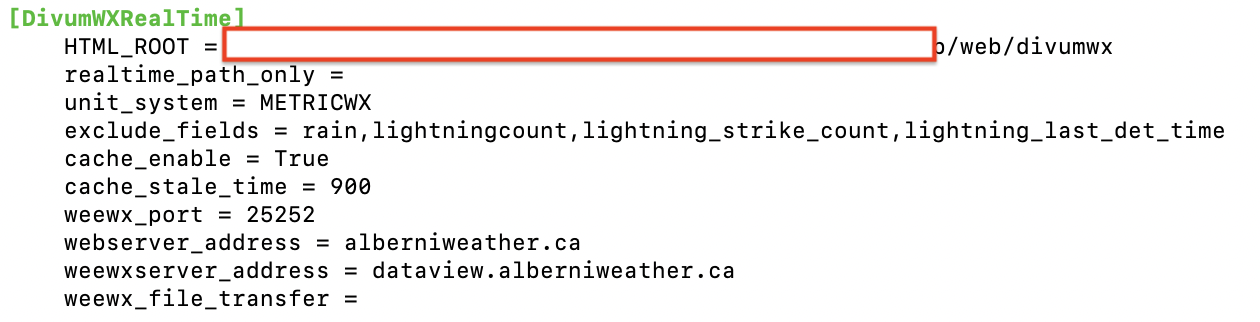
- You may need to open port 25252 on both your external web server and your local incoming router and server.
That’s it! After restarting weewx and waiting 5 minutes for the archives to update, you should now have a functional divumWX system with local server taking in data and sending it to a remote web server like this one at alberniweather.ca.